The Secret
The Secret to Healthy Gums
How to Keep Your Teeth for the Rest of your Life
“The Secret” was initially developed by Dr. Paul Keyes to enable a person to efficiently and inexpensively improve the condition of their own gums. This system reduces redness, swelling and bleeding of the gums and minimizes the need for surgery, improving all but the worst areas in the mouth.
The workability of “The Secret” was tested by Dr. Beata A. Carlson and refined over the years with thousands of patients who today apply this remedy on a daily basis.
It is a home care program to interrupt the formation of plaque and bacteria around the teeth and gums every 24 hours, before they get a chance to populate the mouth. With its use, you can get a fresh start with your gums and teeth and head off the disease process from doing further damage.
The Story of Dental Disease
The presence or absence of gum disease is a reflection of an individual’s ability to withstand the negative influences of improper oral hygiene, poor nutrition and the consumption or use of things toxic to the teeth. A genetic deficiency may be part of the equation but one’s brushing and flossing have a far greater influence.
How to Improve Your Dental Health Naturally?

How important is Oral Hygiene?
Basic oral hygiene is very important. You should brush your teeth at least twice a day for two minutes and floss at least once a day. Using alcohol-free mouthwash can also be beneficial.
What are the steps an individual can follow to maintain oral hygiene?
– Switch to All-Natural Products
You can use toothpaste that is free of toxins and chemicals such as fluoride, artificial sweeteners, artificial colors, Sodium Lauryl Sulfate (SLS), Propylene Glycol, or Triclosan.
Natural toothpaste will improve dental health. Other products that can be used are all-natural mouthwashes and flossing products.
– Oil Pulling
Swishing around sesame or coconut oil between the teeth for about 20 minutes will help pull bacteria from the mouth.
Oil pulling followed with a warm salt water rinse will remove all loosened bacteria and make your teeth healthy.
– Diet
You should keep your diet rich in calcium, magnesium, and phosphorous, all of which are necessary for healthy, strong teeth. You should also get sufficient Vitamins A, E, K, and D, which are also beneficial to dental health.
Foods containing phytic acid and foods with high sugar content are recommended to be avoided.
– Plants and supplements
Certain plants, such as Neem, which have antibacterial properties, will help to improve gum health. Tea tree oil, cranberries, and Vitamin C are also known to improve gum health.
The word “sulcus” means a furrow, and is the space between the tooth and the tissue that extends all the way around each tooth. The purpose of the sulcus is to connect the gums to the teeth in a way that stops disease-causing bacteria from entering the teeth and body through the gums. The tissue of the sulcus contains a high number of white blood cells which are the cells of the immune system that protect the body from infectious disease.
In healthy gums, the depth of the sulcus is less than 1 mm. If the pockets exceed 1 mm it tells you and the hygienist that bacteria are getting the upper hand, entering the sulcus, attaching to the tooth and tissue forming a biofilm, a hard layer of protection around the bacterial colony.
It takes only 24 hours for the bacterial deposit to form into colonies and in seven to ten days the colony structure is such that it can support a variety of anaerobic bacteria.
“The Secret” is a way to halt the accumulation of microorganisms that so negatively affect the teeth and surrounding tissue thus preventing the colony build up and the eventual accumulation of their byproducts (waste or excrement) which are so toxic or poisonous to the body. The natural reaction of the body is to separate itself from these poisons through the inflammatory process (a nautrual immune system response of the body), which results in bleeding, swelling and redness of your gums. This is your body’s way of trying to heal itself. However, if the bleeding, swelling and redness cannot be cleared up after a reasonable amount of time, the bone around the teeth is affected. That’s why teeth are eventually lost, starting with even minor gum problems.
The body needs some help to repair the situation. To do this requires more than just brushing your teeth. You must change the acidity level in the sulcus and also stimulate the gum tissue to increase the flow of blood, which brings nutrition and oxygen to that area. Stimulating the gum area also removes waste from the tissue.
Doing “The Secret” works best when preceded by a thorough professional dental cleaning which removes hardened plaque (tartar or calculus) from your teeth. If a prior cleaning is not possible, it is still beneficial to follow this program, but results may vary and may take longer to achieve.
The “Secret” Revealed

The Secret to Healty Teeth & Gums Part 1

The Secret to Healty Teeth & Gums Part 2
There are three main instruments (along with some options if your budget allows) to be used as part of your home remedy. All three instruments are to be used as therapeutic as well as maintenance tools. Plus a “healthy gum recipe,” which is The SECRET that makes it all work. The SECRET is the combined use of all or part of all these that create health – the signs and symptoms are gone.
Tool #1 – The Brush
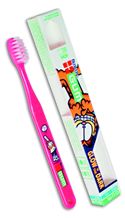
The first instrument is a toothbrush – a child’s small, soft, three-rowed brush (we suggest Butler’s #114, Garfield, which is available at our office. You are going to use this brush to apply the following Secret recipe to your gums.
Healthy Gum “Secret” Recipe
The Secret consists of both DRY and WET ingredients.
Dry ingredients:
(i) Baking Soda (sodium bicarbonate) – either regular or pharmaceutical grade (available at our office). If you are sensitive to sodium, then use potassium bicarbonate. AlkaMax is a good substitute.
- Himalayan salt, fine grind (available at our office) or
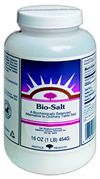
- Bio-Salt, or
- Celtic salt, or
- Regular table salt, or
- Parkelp, a granulated kelp, available in a package or bulk at health food stores, or
- Sodium-free (potassium) salt for salt restricted diets.
Combine your dry ingredients in a small jar with a lid in the following ratio: three (3) parts Baking Soda and one (1) part salt
Shake this dry mixture to blend well. Keep this dry mixture in your bathroom. You will be using this every day.
Application
When you’re ready to apply the Secret Recipe, pour between a teaspoon and a tablespoon of this DRY mixture from the container into your palm.
Wet ingredient:
Liquid will be added to the dry mixture in your hand to create a paste each time you’re ready to do “The Secret.”
For liquid, you can use either:
- Colloidal Silver (available at our office) – safe if you still have mercury amalgam fillings, or
- Hydrogen peroxide – only if you have no metal (mercury/amalgam) fillings in your mouth, or
- Aloe Vera
Adding such products as Amazon Herb’s Una de Gato (a natural antioxidant) will help too.
Drop a bit of the liquid into the dry mixture in your palm to create a thick paste. You will learn from experience on how much of your RECIPE to use.
Again, the key items are Baking Soda, Salt, Hydrogen Peroxide (or Colloidal Silver if you have metal amalgam fillings).
Directions
- Load a bunch of the mixture onto the soft brush. Angle the brush 45 degrees to where the tooth meets the gum (the sulcus junction).
- Push the loaded brush as far as you can into the area where the tooth meets the gum (sulcus). Do not cause yourself pain.
- Use a vibrating motion (very small wiggling motion) so that the bristles that are forced into the sulcus remain there as you vibrate. It’s an agitating type of motion. Do not use wide circular motions like scrubbing a floor or washing a window. Repeat this action as you move along the gum line for three to five seconds at each spot on both the cheek and tongue side.
As you apply more of The SECRET mixture to the brush, be sure to continue where you left off on the gum line. Repeat this procedure until you have completed both upper and lower gum lines. Whenever necessary spit out the mixture and saliva. There is no need to rinse afterwards, unless you want to.
The soft brush is the applicator/loading instrument that is used to get the recipe into the sulcus.
The recipe does the work, not the brush; the brush forces the recipe into the sulcus. Doing the above on a gradient approach will obtain healing in the sulcus. Do it once a day until you can gradually increase to twice a day. When you are able to do it twice a day for two weeks in a row, your gums should have become very tough (this is good) and should have a pink-white color (this is also good).
The healthy gum recipe creates an environment in and around your teeth in which the harmful bacteria can’t live (they can’t stand oxygen and/or silver water). The recipe neutralizes the acid environment in the sulcus (which is created from the waste products of the bacteria). These harmful bacteria don’t like the alkaline, or neutral, environment created by the salt, baking soda, colloidal silver and/or hydrogen peroxide.
Tool #2 – The Butler Rubber Tip Stimulator
It will be much more efficient using the Rubber Tip after you can brush twice a day with the recipe above your gums are then tough and a pink-white color. This would minimally be two weeks after you start this program.
Do not begin using the Rubber Tip until you can brush twice a day with the recipe above and your gums are now tough and a pink-white color. This would minimally be two weeks after you start this program.
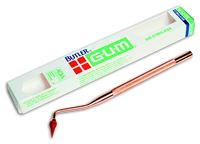
The rubber tip is used to shrink the swelling around the teeth. This swelling redness, bleeding, odor, etc. is referred to as periodontal disease. Periodontal refers to ‘existing around gums and teeth.’ Use the rubber tip on both the cheek and tongue side with maximal contact of the rubber in the triangular portion of the gum between the teeth.
This instrument serves the same purpose as the muscles do in your body. You are literally exercising your gums. Here’s how it works. Blood carries food to the cells and takes waste away from these same cells. Without the muscles, the blood would merely pool in the body because of gravity. As you exercise the gums, nutrients and blood are carried to the gums and then away from the gums creating strong circulation and therefore good, healthy, long-living tissue.
It’s true that the heart (a muscle) is the main pump for this system, but in no way can it do the complete job. The muscles play a major part in helping to carry nutrients and remove waste. This is why it’s important to stay physically fit if you want to live a long life. Staying physically fit means keeping one’s muscles toned so they can apply pressure and thus motion to the blood vessels that carry the supplies to, and the waste away from, the cells.
So, when a person has the symptoms of diseased gum tissue, it generally means that he is not getting enough food to, or waste from, the gum tissue. For disease to be present, this lack of circulation has been present for a long time.
It is known that the gums have an extreme power to rebound back to health within a few short weeks, if regular and proper attention is given to them. That is why the rubber tip is one of the keys to The Secret.
How to use the rubber tip

- Push the rubber tip in between the teeth – straight in – at the triangular piece of gum between the teeth, so that it slides up on top of this gum triangle.
- Push down (lower teeth) or up (upper teeth) as hard as you can, within reason. Do not cause yourself pain. Some discomfort may be felt, however.
You’ll notice that the tip of the stimulator is at an angle. This is so that you can lay the half inch of the tip against the flesh between the teeth. Lay the rubber tip against the gum so that all of the rubber part is against it and stimulate. You’re not just putting the tip end between the teeth. THIS IS A VERY KEY POINT. Then gently massage the V-shaped gum area with the tip.
NOTE: Imagine rubbing a small spot on your arm for a minute or two. It will get red, after you quit. What you have done is brought blood to that area. That is what you want to do with the rubber tip.
Then, gently massage the V-shaped gum area with the tip. Push the rubber tip up, down or sideways left and right, circular for (10) ten seconds. Do this on the inside and outside of the row of teeth, wherever there is gum that lies between your teeth.
Move to your next tooth and begin the stimulating process again. If you still have all your teeth, you would have 60 places to rub (inside and out). So 60 x 10 seconds is 600 seconds, or at least 10 minutes of treatment time.
Now, before you decide that this is too much time, realize that after you learn how to do this, it could easily be done while reading, watching TV, while being driven in a car (we suggest you only do this in front of close friends) or after your evening meal. Time does not have to be your enemy. Be creative in finding the time to improve your dental health.
Note: To take a few minutes each day to properly care for your teeth and gums will save you many hours in a dentist’s chair.
Tool #3 Dental Floss (Dental Tape, Ribbon or String)
The third instrument is dental floss, also known as tape or ribbon.
The reason flossing is the third instrument recommended (and not the first) is that flossing is not therapy, it’s a maintenance procedure. The brush, along with the recipe and rubber tip, provides therapeutic healing. By the time you get to using floss, you are healed and can now maintain that health.
With regard to flossing, the thicker the string, the more surface area that can contact the interior of the sulcus – this results in a more thorough cleaning. It’s true that you can break up and remove a lot of the bacterial colonies with the brush, but nothing gets in between the teeth like dental floss, it’s just a mechanical fact.
Here’s how to floss:
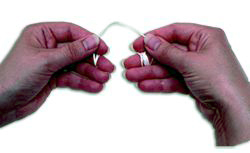
- Pull out 30 inches of floss. Wind most of that around the middle finger of one hand, and the tail-end around the middle finger of the other hand
- Pinch the string between the thumb and index finger of both hands, leaving one to two inches in between. As you floss, continually unroll a one to two inch span of clean string from the finger that has the most string over to the middle finger of the other hand. Be willing to waste a few feet of floss so that you can practice.
- Use your thumbs to direct the string between the upper teeth. Use your index fingers to direct the string between the lower teeth. The key to the whole process is the ability to use the index fingers and thumbs to manipulate the string into a C shape halfway around the tooth so that it maximally contacts the outline of the sulcus between the teeth. The string must go beneath the gums and as deep into the sulcus as possible while still not cutting the gums.
Optional Information
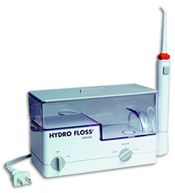
Water Irrigation
This step is recommended. If you cannot afford to add this step into the program, do not let it stop you from experiencing the benefits of the first three steps.
The fourth instrument we recommend is the HydroFloss, a hydromagnetic oral irrigator or a Viajet oral irrigator that can drastically inhibit the formation of plaque (thick sticky substance caused by leftover food particles and bacteria) and tartar (hard yellowish substance). As time goes by, plaque, if not removed, turns into tartar. Oral irrigation rinses away bacteria with the force of its stream/pulse of water.
Whether brushing and/or flossing, you will not thoroughly clean pockets of 4 mm (millimeter) or more. A toothbrush is not designed to clean anything more than 1-3 mm, which is a normal healthy gum condition. Therefore the Hydrofloss or ViaJet is necessary to reach those pocket areas that cannot be maintained with the toothbrush and floss alone.
Tips & Tricks
Apply these remedies on a slow gradient—take a step-by-step approach, both in the application of the information and intensity of force used with the instruments. You’ll know that you are using the instruments too forcefully if your gums still hurt five or ten minutes after you finish, or if the next day you can’t brush, or you can’t use the rubber tip or floss in a particular area because it hurts too much. In this case, use the instruments more gently – drop back a couple of notches of force.
Expect your gums to bleed mildly for at least the first week or two while you are following this program. After about ten days this bleeding should cease, as the pockets will close and form a seal in the sulcus and stop leaking blood. The stronger the seal, the greater the barrier to prevent the spreading of bacteria and toxins into your bloodstream. So, you see, improving your dental health may improve your overall physical health.
You now know the steps to acquiring healthy gums, along with maintaining them. After a little practice your gums will acquire a certain feel and you’ll learn how to fully utilize these instruments on both sides of all the teeth in your mouth. With a high degree of expertise, your control and use of these tools will become almost an art form.
The baking soda will turn the gums a white-ish color, then they will turn gradually a very white pink as they toughen up!
You now know the steps to acquiring healthy gums, along with maintaining them. After a little practice your gums will acquire a certain feel and you’ll learn how to fully utilize these instruments on both sides of all the teeth in your mouth. With a high degree of expertise, your control and use of these tools will become almost an art form.
The purpose of applying these techniques is to reduce (shrink) the depth of the sulcus in the therapeutic phase, so that later, when you’re in the maintenance phase, you can thoroughly clean your teeth and gums on a daily basis with ease. If the pocket depth is not adequately reduced to enable you to remove accumulation once every 24 hours, you will definitely not be able to control your dental disease by yourself and should seek professional care.
But, with this system, you’ll begin to see real shrinkage. The key point is that if your situation can be handled, it will be handled. If your condition is too advanced, you will need to seek professional care. The only one who can determine this is your dentist. Unfortunately, in some cases, there is no substitute for periodontal surgery if the patient wants to obtain a fresh start and full pocket elimination.
It’s up to you. You’ve heard it before. But in the end, it’s up to you to look, listen, and feel and then implement those habits and lifestyle changes that can keep you healthy. Who cares the most about your health? Of course, it’s that person who looks back at you in the mirror every morning.
Here’s to saving your teeth through healthy gums and acquiring the best of physical health.
If you wish to have healthier gums, then START!!
“The Secret” to healthy gums was compiled, tested and refined over the years by Ray Behm DDS. © 2005, 2010 by Ray Behm


